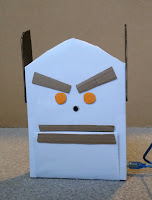
What’s the best way to celebrate Halloween in the office? How about making the pointy-haired boss character from Dilbert that lip syncs to sound using nothing more than a cereal box and a micro-controller? Imagine the laughters you will get when you bring it to a meeting, put it on the table and have it start lip syncing to the conversation in the room. Your boss may also appreciate your sense of humor (or not)!
Here is a video of the pointy-haired boss lip syncing to sound played on my computer.
- Cereal box
- Corrugated cardboard
- Color marker (black and orange)
- Paperclip
- Double sided tape
- Paper glue
- Printer papers (3 sheets)
- Arduino UNO R3
- Arduino jumper wires (6 pcs)
- USB cable (for Arduino)
- Tower Pro Servo and gear
- KY-037 sound sensor
- 220 Ohm resistor (optional)
Instead of Ardunio UNO R3 as the micro-controller, you can also get by with cheaper models from Arduino or clones.
How to Prepare the Cereal Box?
You can probably figure it out from watching the video above but here are the steps:
- Cover up the cereal box with printer papers using glue
- Cut the eyes, eyebrows, hair and lips from corrugated cardboard
- Paint the hair pieces with black marker
- Paint the eyes with orange marker
- Tape or glue the facial features to the cereal box
- Cut a small round nose hole for the microphone
- Cut open a sizable mouth flap
Here are a few more mugshots to help you see the design from different angles.
How to Mount the Microphone as Nose?
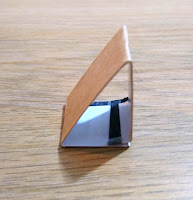
Build a small triangular bracket from corrugated cardboard box.

Similar to how you would use a shelf bracket, tape the sound sensor onto the bracket, then tape the bracket inside of the cereal box wall where the nose is at. The sensor microphone should protrude a little bit out of the nose hole.
How to Connect the Mouth Flap to Servo?
Mount the plastic gear to the servo so that it's parallel to the servo. Bend the paper clip into shape and hook one end to the servo gear.

Cut two small rectangles from corrugated cardboard and glue them to the back of the mouth flap. The rectangles serve as a hinge for the mouth flap.
Insert the other end of the paperclip into the corrugated rectangle. The pictures below show the paperclip partially inserted but once fully inserted, the paperclip is locked in place between the two rectangles preventing it from sliding out.


Tape the servo inside the cereal box on the bottom at a location that lifts up the mouth flap. In other words, the mouth is closed at this servo placement.
For my cereal box, this location is near the center.
How to Wire up the Circuit?
Using the jumper cables,
- Connect the sound sensor analog input to pin A0 of Arduino
- Connect the sound sensor power to +5 and GND of Arduino
- Connect the servo control to pin 9 of Arduino
- Connect the servo power to +3.3 and GND of Arduino
As best practice, it's recommended to bridge a 220 Ohm resistor between the servo and Arduino instead of connecting the two directly.
How to Program the Arduino?
Of all the steps, this is the easiest. Upload the following "sketch" using the Arduino IDE.
#define MAXELMS 5
#include <Servo.h>
int inputs[MAXELMS];
bool isInputIncreasing;
Servo servo;
int servoPin = 9;
int sensorPin = A0;
long lastTime = millis();
int angleClose = 0;
float angleOpen = 20;
void setup() {
servo.attach(servoPin);
pinMode(sensorPin, INPUT);
servo.write(angleClose);
}
void loop() {
// store MAXELMS number of samples
for (int i=1; i<MAXELMS; i++) {
inputs[i-1] = inputs[i];
}
inputs[MAXELMS-1] = analogRead(sensorPin);
// compute if input values are increasing
isInputIncreasing = true;
for (int i=1; i<MAXELMS; i++) {
isInputIncreasing &= inputs[i] >= inputs[i-1];
}
long elapsedTime = millis() - lastTime;
if (isInputIncreasing and elapsedTime > 120) {
servo.write(angleOpen);
delay(180);
servo.write(angleClose);
lastTime = millis();
}
}
The analog input of the KY-037 sound sensor samples sound waves as unsigned integers. The code looks for a rising wave signal as trigger. When detected, it instructs the servo to rotate 20 degree and holds for 180 milliseconds before returning to 0 degree. At 0 degree, the mouth is closed. At 20 degree, the mouth is open.
Troubleshooting Tips
- If the mouth starts moving continuously without any apparent external sound trigger, it may be due to feedback noise from the movement of the mouth itself. Try cushioning the sound sensor from the cereal box with something soft like a piece of sticky chewing gum.
- If the servo jams, try increasing the two delay timers in the code.
Happy Halloween!


No comments:
Post a Comment