Friday, October 21, 2016

Initialize, Load and Save Data in ECL

In a previous article, I introduced HPCC and ECL, the data-centric declarative programming language for HPCC.  In this first article on ECL, I'll share what I have learned about ECL after experimenting with it for a while.  As ECL and HPCC are about extract, transform and load data, I'll demonstrate using a toy data set consisting of person names and dates of birth. I'll continue to use this data set in the following articles on ECL.

Without further adieu, we first declare the format of the incoming data.

Record_Member_Raw := RECORD
    UNSIGNED8 Id;
    STRING15 LastName;
    STRING15 FirstName;
    STRING20 Birthdate;
END;

The syntax is rather intuitive. We're declaring a data row or record consisting of 4 fields and their data types are 8 bytes unsigned integer, 15 bytes string, 15 bytes string and 20 bytes string.  ECL strings are space padded and not null-terminated.  Also, ECL is not case sensitive so Record_Member_Raw is same as record_member_raw, LastName is same as lastname, and UNSIGNED8 is same as unsigned8.

In the real world, you will be getting your data from an existing data source but in this case, I'm hardcoding the data manually to members_file_raw:

members_file_raw := DATASET([
    {1,'Picard','Jean-Luc','July 13, 2305'},
    {2,'Riker','William','2335'},
    {3,'La Forge','Geordi','February 16, 2335'},
    {4,'Yar','Tasha','2337'},
    {5,'Worf','','2340'},
    {6,'Crusher','Beverly','October 13, 2324'},
    {7,'Troi','Deanna','March 29, 2336'},
    {8,'Data','','February 2, 2338'},
    {9,'Crusher','Wesley','July 29, 2349'},
    {10,'Pulaski','Katherine','2309'},
    {11,'O\'Brien','Miles','September 2328'},
    {12,'Guinan','','1293'}], Record_Member_Raw);

Our data set consists of 12 records.  The records are of type Record_Member_Raw.  To display or output the data set or recordset result, add the following code to your ECL script.

OUTPUT(members_file_raw);

OUTPUT(members_file_raw(lastname='Data' OR id=3));

OUTPUT(members_file_raw[1]);

OUTPUT(members_file_raw[1..3]); 

The first output dumps the entire data set.  The second selects only records meeting the filter condition.  The third outputs only the first record.  Note, ECL indexing starts with 1 and not 0.  Indexing can also be a range like in the last output which returns the first 3 records.  You can also save the output to file:

OUTPUT(members_file_raw, ,'~FOO::BAR::Members', OVERWRITE);

The OUTPUT action will be used frequently in debugging ECL code.  To learn about what each ECL action does, the ECL Language Reference is your best (and only) source of help.

Remember earlier I said that in the real world, you will be getting your data from an existing data source.  Well, now you have a data source which is the file you just created.  To load the file, the command is:

loaded_members_file := DATASET('~FOO::BAR::Members', Record_Member_Raw, THOR);

In this article, I showed how to initialize, load and save data in ECL.  In the next article, I'll pre-process the data by parsing the date of birth into separate month, day and year fields.


Thursday, October 20, 2016

First Encounter with HPCC and ECL

I have been trying out HPCC for a few days now.  HPCC is an open source big data platform developed by LexisNexis which can run on commodity computing clusters like Amazon AWS.  HPCC includes its own declarative programming language called ECL to extract, transform and load large scale data.  Being a declarative programming language, it belongs to the same class of languages as SQL as opposed to imperative languages like C/C++, Java, Python or PHP.  On first sight though, ECL looks a bit like C++.  Perhaps it has to do with the fine granularity of control permissible by ECL such as file pointers and bytes allocation as we shall see.


Setting up

So how does one get started with HPCC quickly and freely?  For me, the path of least resistance was to download and install the HPCC virtual image and run it with VirtualBox.  This will deploy a pre-configured linux based HPCC guest server running in your local machine for demo purposes.

Next, you'll need to install an IDE to interact with the server and expedite ECL programming.
Though an IDE is not required and command line interface tools are available for download, many of the online tutorials assume you're using an IDE, in particular, the ECL IDE for Windows.  I was lucky to have my old copy of Windows 7 lying around which I installed ECL IDE to.  So now I have both HPCC server and Windows 7 with ECL IDE running as guests on my Mac using VirtualBox and everything is working okay (after some hiccups).


Getting Acquainted

While there are various learning resources available on the HPCC website, they are scattered on different pages.  It can be a flustering experience not knowing which ones you should start with and in what order.  Also, some of the resources are seemingly locked away for customers only or require access credentials.  Hopefully, by the time you're reading this, the resources are better organized.

  1. In hindsight, I would start by reading Running HPCC in a Virtual Machine to help with the installation and usage of ECL IDE.

  2. To gain a little bit more insights into ECL, I read HPCC Data Tutorial and followed the short programming examples.

  3. Depending on your preference, you could watch some of the short tutorial videos.

  4. What helped me the most so far is the ECL Programmers Guide.  It's my Rosetta stone to ECL.  I hope they would continue to expand the guide and coverage with more examples.  When reading the guide, you would need to frequently consult the ECL Language Reference.

I haven't read everything there is yet and most likely, there are other useful resources I haven't stumbled upon yet.  Hopefully, these are enough to get you started with HPCC.  In my next article, I'll share what I've learned so far on programming with ECL.

Thursday, September 1, 2016

Storing HTTP Sessions with Amazon Elastic File System (EFS)

Amazon has recently released the Elastic File System (EFS) to the general public after a long beta period.  According to Amazon, EFS is a distributed file system capable of high throughput, low latency and auto scaling in addition to fault tolerance.  In the US region, EFS costs $0.30/GB-month at the time of writing.  You can NFS-mount and share an EFS file system with multiple EC2 instances in Virtual Private Cloud (VPC) or non-VPC via ClassicLink.

There are many applications that can take advantage of a distributed file system.  For example, if you are running a web application on multiple machines in a cluster, you can use EFS for storing user HTTP sessions.  One of the benefits is that EFS costs far less than running ElasticCache, a Memcached compliant service offered by Amazon.

Setting up EFS in a VPC is easy and Amazon provides step-by-step tutorial on how to do this.  Once you have EFS and security group set up, you can use cloud-init to mount the EFS file system automatically at EC2 Instance Launch by following the Amazon instructions at

http://docs.aws.amazon.com/efs/latest/ug/mount-fs-auto-mount-onreboot.html

This involves adding a script during the Launch Instance wizard of the EC2 management console. The script installs the NFS client and writes an entry in the /etc/fstab file to mount the EFS file system on /mnt/efs with the following line:


 echo "$(curl -s http://169.254.169.254/latest/meta-data/placement/availability-zone).file-system-id.efs.aws-region.amazonaws.com:/    /mnt/efs   nfs4    defaults" >> /etc/fstab


The mount target DNS name is dynamically constructed so that you don't accidentally mount your file system across the wrong Availability Zone.

For my own web application running on Amazon Linux nodes, I did not want to hassle with cloud-init so I opted for a different approach of auto-mounting EFS by appending the following line to /etc/rc.d/rc.local


 mount -t nfs4 -o nfsvers=4.1 $(curl -s http://169.254.169.254/latest/meta-data/placement/availability-zone).file-system-id.efs.aws-region.amazonaws.com:/ /mnt/efs


Note, you must replace file-system-id and aws-region with your own values.  For example, aws-region could be us-east-1 depending on your EC2 region.

In case you're wondering, you cannot run scripts or use environment variables within /etc/fstab, so it's not possible to run the curl command for mount target DNS name in /etc/fstab directly.  This is the reason why I chose to append to /etc/rc.d/rc.local instead.


Got Too Many Session Files?

If your web application uses PHP and leaves a lot of expired session files behind, you should consider disabling the default session garbage collection and replace it with a scheduled cron job because, by default configuration, there is a 1% chance that PHP will garbage collect session files on each request.  On EFS, file operations like directory listing are slower than local file system, so this can potentially cause your web application to be less responsive every time the garbage collector kicks in.

To turn off session garbage collection, set session.gc_probability to 0 in php.ini and restart your web server.  Next, add the following cron job to garbage collect session files.


 */5 * * * * find /mnt/efs -type f -mmin +60 -delete &>/dev/null


This will run every 5 minutes and delete all files with modified time older than 60 minutes in /mnt/efs.  Now, you're good to go!

Monday, August 1, 2016

The Tortoise and The Hare - Array_splice vs Array_pop in PHP

Sometimes, the most succinct and elegant piece of code can fall short on other factors like speed of execution due to the hidden complexity of the underlying code powering a high level language like PHP.  This happened to me today while I was refactoring a data processing routine.  For a fleeting moment, I experienced a sense of accomplishment having managed to reduce the number of lines of code in the routine to make it more readable and maintainable.  Unfortunately, that gleeful moment only lasted until I ran the routine against a data set.  To my utter surprise, the code ran 900 times slower than before!

Through the process of elimination, I tracked the culprit down to the PHP function array_splice.


 array array_splice ( array &$input , int $offset [, int $length = 0 [, mixed $replacement = array() ]] )


From the PHP manual, the array_splice function

"Removes the elements designated by offset and length from the input array, and replaces them with the elements of the replacement array, if supplied."

For my task, I needed to process the elements in an array starting from the end with a set of N elements at a time so array_splice seemed like the perfect function to use.  The code I had before refactoring was similar to the following stripped down snippet:


 // initialize arrays with 50,000 elements
 $arr = array_fill(0, 50000, 'abc');

 // remove last 5 elements at a time using array_pop
 while (count($arr)) {
    $subArr = [];
    for ($i = 0; $i < 5; $i++) {
        $subArr[] = array_pop($arr);
    }
 }


In the snippet above, N is set to 5 (i.e. remove 5 elements at a time), but in reality, N can change inside the while-loop so the PHP function array_chunk is not applicable.  Also, array_slice isn't appropriate because I needed the input array to be truncated inside the while-loop.

The following refactored version replaces the ugly inner for-loop with a single array_splice statement.


 // initialize arrays with 50,000 elements
 $arr = array_fill(0, 50000, 'abc');

 // remove last 5 elements at a time using array_splice
 while (($len = count($arr)) > 0) {
    $subArr = array_splice($arr, $len - 5);
 }


Don't you agree the refactored version is simpler and easier to read?  At least I thought so.  Unfortunately, while the version before refactoring took < 0.02 second to complete, the refactored version took 18 seconds in Zend PHP 5.6.  Furthermore, as the number of elements in the array scales up, the execution time for array_splice is non-linear while array_pop is more or less linear.  This is illustrated in the following graph by comparing the running time of the two code snippets above over an increasing array size.


Execution Time of Array_splice vs Array_pop


My first thought was that perhaps arrays are implemented as singly linked lists in PHP so every time array_splice() is called, the linked list has to traverse from start until the given offset is reached near the end of the list.  This would explain the non-linear time performance.  If that's the case, if I use array_splice() to remove the first N elements instead of the last N elements as in the following code snippet, the time performance should be linear.


 // initialize arrays with 50,000 elements
 $arr = array_fill(0, 50000, 'abc');

 // remove first 5 elements at a time using array_splice
 while (($len = count($arr)) > 0) {
    $subArr = array_splice($arr, 0, 5);
 }


Strangely, when I ran the test, the run time is almost identical to the graph above so I'm at a loss. I have only tested this with Zend PHP 5.6.  I don't have Zend PHP 7 or HHVM at my disposal but I wonder how they stack up.

Monday, July 11, 2016

Audit ModSecurity Log Quickly and Systematically with Reconity

Having recently installed ModSecurity as my web application firewall, I started to keep an eye on the audit logs generated by ModSecurity regularly.  The audit log records web access events which had set off any of the configured firewall rules.  For example, an event entry in the log may look this (IP addresses have been masked for privacy):

--d9g76d43-A--
[27/Jun/2016:08:18:10 +0000] V3GlK2-sf88lhesfakqlUgAAI X.X.X.X 57596 Y.Y.Y.Y 80
--d9g76d43-B--
GET /../../../../../../../mnt/mtd/OCxW HTTP/1.1
Host: Z.Z.Z.Z
User-Agent: Mozilla/5.0 (Windows NT 10.0; WOW64) AppleWebKit/537.36 (KHTML, like Gecko) Chrome/48.0.2564.103 Safari/537.36
Accept-Encoding: gzip
Connection: close

--d9g76d43-F--
HTTP/1.1 400 Bad Request
X-Content-Type-Options: nosniff
Content-Length: 226
Connection: close
Content-Type: text/html; charset=iso-8859-1

--d9g76d43-H--
Message: Warning. String match "Invalid URI in request" at WEBSERVER_ERROR_LOG. [file "/etc/httpd/modsecurity.d/activated_rules/modsecurity_crs_20_protocol_violations.conf"] [line "82"] [id "981227"] [rev "1"] [msg "Apache Error: Invalid URI in Request."] [data "GET /../../../../../../../mnt/mtd/OCxW HTTP/1.1"] [severity "WARNING"] [ver "OWASP_CRS/2.2.8"] [maturity "9"] [accuracy "9"] [tag "OWASP_CRS/PROTOCOL_VIOLATION/INVALID_REQ"] [tag "CAPEC-272"]
Apache-Error: [file "core.c"] [line 4306] [level 3] AH00126: Invalid URI in request %s
Stopwatch: 1467015490548268 657 (- - -)
Stopwatch2: 1467015490548268 657; combined=435, p1=213, p2=0, p3=1, p4=41, p5=131, sr=92, sw=49, l=0, gc=0
Producer: ModSecurity for Apache/2.8.0 (http://www.modsecurity.org/); OWASP_CRS/2.2.8.
Server: Apache
Engine-Mode: "ENABLED"

--d9g76d43-Z--

The above entry tells us that one of the installed rules caught and blocked an illegitimate attempt to access private and protected resource on the server.  According to the entry, the source of the intrusion was X.X.X.X, the offending request was "GET /../../../../../../../mnt/mtd/OCxW", the response was "400 Bad Request" and the rule in violation was 981227.

Often, my audit log also contains false alarms or events pertaining to the internal workings of ModSecurity rather than an external offense such as:

--9fj387gd-A--
[13/Jun/2016:15:48:05 +0000] V11sVtSgC7wd3k4LMd8eSAXAAAg 127.0.0.1 52076 127.0.0.1 80
--2ab87c12-B--
POST /foo HTTP/1.1
Host: localhost

--9fj387gd-F--
HTTP/1.1 200 OK
X-Content-Type-Options: nosniff
Content-Type: application/json; charset=utf-8

--9fj387gd-H--
Message: collections_remove_stale: Failed deleting collection (name "ip", key "X.X.X.X_c7ad53c03q60y9cdrf1e71t5e4k04bx21e589z6e"): Internal error
Apache-Handler: application/x-httpd-php
Stopwatch: 1465832885236582 714358 (- - -)
Stopwatch2: 1465832885236582 714358; combined=4576, p1=259, p2=0, p3=0, p4=0, p5=2162, sr=104, sw=2, l=0, gc=2153
Producer: ModSecurity for Apache/2.8.0 (http://www.modsecurity.org/); OWASP_CRS/2.2.8.
Server: Apache

--9fj387gd-Z--

This particular event is harmless and is caused by a bug in ModSecurity as discussed in a previous article.

A typical log of mine contains a garden variety of events like the ones above.  When the log is big, sifting through it becomes time consuming especially if I want to examine every single recorded event out of paranoia.  What I needed was a simple tool for exploratory analysis of the log.  Being a software engineer, I decided to spend some time building a tool to my specification.

And so born Reconity, an online interactive log auditing tool for ModSecurity.  The tool extracts key event information from part A, B, F and H of the log into an interactive table so I can inspect events quickly.  With a single mouse click, I can hide events like the aforementioned internal errors from view and switch my attention over to other more serious events.  The tool was built in mind to help audit log systematically by narrowing down important events quickly.

Reconity

I wrote the tool mostly in JavaScript so that it can run in a browser.  There is no manual to learn or read as the web user interface is intuitive.  Since processing is done within the browser, there is no need to upload log file to a remote machine for processing or invoke commands at the command line.  This means sensitive log data remains private and local to the browser computer.  While JavaScript may not be the fastest programming language out there, I was able to audit 100,000 events (~200 MB log file) responsively with the tool.  With optimization, I should be able to extend the limit further if my log ever get bigger than 200 MB.

As I have been using the tool for weeks now, I find that it saves time for me from the laborious task of log auditing.  If auditing ModSecurity log is one of your regular routines, you are welcome to simplify the chore with Reconity!

Tuesday, July 5, 2016

Web Application Vulnerability Scanners

In a previous article, I discussed how to set up ModSecurity for Apache 2.4 on Amazon Linux AMI to protect web applications against exploits and abuses.  Having set up ModSecurity myself for my own web application recently, I was curious how my ModSecurity firewall would protect against publicly available hacking tools out there.  I was in for a learning curve as I learned about what's out there.

IMPORTANT:  The scanning tools introduced below may choke your web application with heavy traffic so proceed with caution and permission!


Kali Linux


So what's the easiest way for a layman to start?  I discovered the path with least resistance is to download Kali Linux.  Kali is a freely distributed Debian-based Linux system pre-loaded with many vulnerability scanners and hacking tools which are what I was after.  Since I already use VirtualBox, the quickest way to get it up and running is to download the Kali Linux virtual box image from:

https://www.offensive-security.com/kali-linux-vmware-virtualbox-image-download/

The image is about 2 GB so be patient.  If you prefer the Kali Linux ISO image instead, it's also available at:

https://www.kali.org/downloads/

Once you have downloaded the VirtualBox image, you can create a new virtual machine in VirtualBox by going to File > Import Appliance.  It took a few minutes to create the virtual machine, for example, on a Mac Pro.

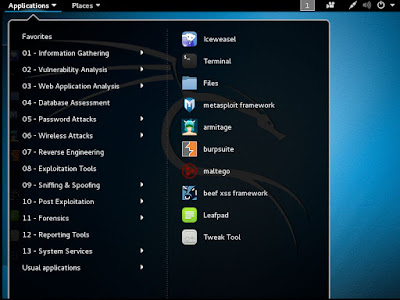
Now, launch the new virtual machine and log in as root.  The default root password is "toor".  There are many tools to choose from.  Here's a screenshot of what's under the Application menu.


Nikto


One of the scanning tools under Application > Vulnerability Analysis is Nikto.  From the official website:

"Nikto is an Open Source (GPL) web server scanner which performs comprehensive tests against web servers for multiple items, including over 6700 potentially dangerous files/programs, checks for outdated versions of over 1250 servers, and version specific problems on over 270 servers. It also checks for server configuration items such as the presence of multiple index files, HTTP server options, and will attempt to identify installed web servers and software. Scan items and plugins are frequently updated and can be automatically updated."

For usage information, please refer to the Nikto official website at https://cirt.net/nikto2-docs/

The command to start a Nikto scan is nikto -h www.my_website123.com.  While scanning, Nikto reports potential vulnerabilities to the command console as they are found:

- Nikto v2.1.6
---------------------------------------------------------------------------
+ Target IP:          X.X.X.X
+ Target Hostname:    www.my_website123.com
+ Target Port:        80
+ Start Time:         2016-05-17 12:27:25 (GMT-4)
---------------------------------------------------------------------------
+ Server: Apache
+ Retrieved x-powered-by header: PHP/4.1.1
+ The anti-clickjacking X-Frame-Options header is not present.
+ The X-XSS-Protection header is not defined. This header can hint to the user agent to protect against some forms of XSS
+ The X-Content-Type-Options header is not set. This could allow the user agent to render the content of the site in a different fashion to the MIME type

Different scanners may discover new problems other scanners have not reported so you should try to run a few of them.  It's also very likely that some of the reported problems are false positives or not exploitable by hackers so don't panic.


OpenVAS


There are also other scanners not bundled with Kali Linux   One of them is OpenVAS.  To install OpenVAS on Kali Linux, please refer to:

https://www.kali.org/penetration-testing/openvas-vulnerability-scanning

If your scan finish quickly (<1 minute) and returns without any problems found, chances are your server isn't responding to ICMP requests instead of being absence of vulnerabilities.  You should set "Alive Test" to "Consider Alive" for your scan target.

On the other hand, if your scan finish quickly (<1 minute) and returns with an "Internal Error" and you are using OpenVAS Manager 6.0.5, it's a bug.  Find out which version you have at the terminal by running

openvasmd --version

Then, check if the error log at /var/log/openvas/openvasmd.log shows:

md  main:WARNING:2016-05-17 19h06.25 UTC:26326: sql_prepare_internal: sqlite3_prepare failed: no such table: current_credentials

To fix this, manually add the missing table to the sqlite3 tasks.db file:

CREATE TABLE IF NOT EXISTS current_credentials (id INTEGER PRIMARY KEY, uuid text UNIQUE NOT NULL);

Other Tools


In addition to OpenVAS, there are also other scanners readily available to download and install. Some of the ones I have found are:

Arachni  -  apt-get install arachni
Vega  -  apt-get install vega

At the time of writing, Vega is packaged with a graphical user interface but not Arachni.  If you're trying Arachni, note that a scan may take a long time to finish (as in days or longer) because of its comprehensive nature but it's possible to optimize for faster scans.

Hopefully, this will get you started on securing your web application.  Cheers!

Thursday, June 2, 2016

ModSecurity Failed Deleting Collection

Houston, we have a problem.  Looking at my ModSecurity audit log, I found quite a few log entries similar to the following (I have obfuscated the actual IP address for privacy reason):

Failed deleting collection (name "ip", key “X.X.X.X_"): Internal error

I was concerned that if the collection file was not being cleaned up automatically by Apache or ModSecurity, the file may grow to an astronomical size over time causing other problems.  While I wasn't able to find a definitive cause for the error by searching online, I stumbled upon 3 proposed workaround solutions:
  1. Use memcache for collections
  2. Set SecCollectionTimeout to a small value such as 600 (default is 3600 seconds)
  3. Install and run modsec-sdbm-util in a separate process to clean up the collection file regularly
Option 1 requires ModSecurity 3.0 or git-clone the memcache_collections branch, a choice I didn't want to make hastily.  There are reports that option 2 may not always work for everybody.  Just to be on the safe side, I implemented option 3 in addition to option 2.

For the record, I took the steps below to install modsec-sdbm-util on Amazon Linux AMI running Apache 2.4 with ModSecurity 2.8.

First, install all pre-requisite libraries and tools:

sudo su
yum install libtool autoreconf autoheader automake autoconf apr-util-devel

Then, download and install modsec-sdbm-util to a directory.

git clone https://github.com/SpiderLabs/modsec-sdbm-util.git
cd modsec-sdbm-util
./autogen.sh
./configure
make install

Check that it’s installed successfully by running (assuming ip.pag file is in /tmp):

/usr/local/modsecurity/bin/modsec-sdbm-util -s /tmp/ip.pag

If everything is okay, it should output a status report similar to:

Opening file: /tmp/ip.pag
Database ready to be used.
 [|] 10 records so far.
Total of 17 elements processed.
0 elements removed.
Expired elements: 7, inconsistent items: 0
Fragmentation rate: 41.18% of the database is/was dirty data.

Set up a cron job to run modsec-sdbm-util every half hour or so to remove expired elements from the collection file.

*/30 * * * *  /usr/local/modsecurity/bin/modsec-sdbm-util -k /tmp/ip.pag &> /dev/null

This should do it!  (Cross my fingers.)